Easily move your AVD deployment to Nerdio Manager fast

I have spoken to over 250 different partners and customers throughout the last 10 months. Not only has it been a lot of fun, but it has also been very educational. As a result, I have worked with many smart and fun people, enabling me to view hundreds of different Azure Virtual Desktop environments as well.
Not just the ones built and managed with Nerdio, no; most were already in place and being used for test or production purposes. However, many of these organizations had something in common: they were all looking for a better, easier, and more efficient way to manage and optimize their AVD environments, which inevitably led them to Nerdio.
75% of the people I talk to already have an existing AVD deployment in place. It is no coincidence that they end up with Nerdio, as they all seem to have the same challenges:
- The lack of Azure knowledge within the company
- Azure can be overwhelming and AVD comes with a steep learning curve
- Lots of manual (PowerShell) tasks are involved
- Companies worry about that knowledge leaving their company
- Azure and AVD can be (very) expensive if you do not know what to look out for and lack proper tolling to help you with that
- Big feature gap – Most companies think AVD is not production-ready and misses enterprise-grade features and functionalities
These are all valid concerns and challenges that we run into daily.
Enter Nerdio Manager for Enterprise
It won’t come as a surprise that Nerdio takes care of all the above. Next to that, a question we get a lot is, “OK, I want to explore Nerdio, but I already have a AVD Tenant and/or Workspace in use, what are my options? Do I need to start over, can I reuse my existing host pools, how much time will this take me, etc?”
The answer is reassuring. You can reuse everything you’ve built by onboarding your existing AVD deployment(s) into Nerdio Manager for AVD within minutes and without disrupting any of your users. This means you can do this during production hours without having to worry about your users noticing a thing.
Installing Nerdio Manager for Enterprise
I always refer to getting Azure Virtual Desktop up and running as being a very boring process. This is because Nerdio automates just about every step you can think of. Once Nerdio Manager for AVD is installed, which will take 25 to 30 minutes (all you have to do is wait) depending on how busy Azure is, setting up your initial AVD Workspace together with a hot pool and a couple of virtual machines to go with it only takes an additional 15 minutes or so. That’s assuming you don’t already have an existing AVD deployment in place, of course.
If you do have an existing AVD environment that you would like to continue using, onboarding it into Nerdio Manager for AVD will even be faster; 5-15 minutes depending on how many host pools you have together with the number of virtual machines that need to be “associated” with Nerdio Manager for AVD. We’ll get to that in a bit more detail later on.
Managing your AVD VMs will be done for you
After deploying a new or onboarding an existing AVD environment, you do not have to worry about managing those machines — that is something our unique auto-scale engine will do for you. In short, it will start, stop, reboot, build new VMs from scratch, completely remove these machines when no longer needed, monitor, and repair hosts when needed, and more — all fully automated.
It will also put machines in drain mode when applicable, inform your users that something is about to happen (in your own words), and finally, it will make sure all of your machines will get a unique name (which it can reuse) while also managing the underlying computer objects in Active Directory for you.
It can do all this for hosted shared environments, published applications, non-persistent pooled desktops, and for personal assigned, persistent desktops as well. In fact, we take it one step further. You can give your users more flexibility or responsibility by letting them start, stop, and restart their own personally assigned virtual machines, and log off their sessions when desired.
Roadmap
Not too long from now stopping, (re)starting, logging of sessions, etc., will also be possible for non-persistent pooled virtual machines as well. Together with the ability for your users to resize and re-image their own virtual machines.
Onboarding & continuing use of your existing AVD deployment
Once you are in the graphical user interface of Nerdio Manager for Enterprise, adding an existing AVD deployment is easy and will take you 2 minutes, tops. Let me show you.
First, go over to “Settings” within the left-hand side menu and select “Azure environment”. You’ll end up here – see below.
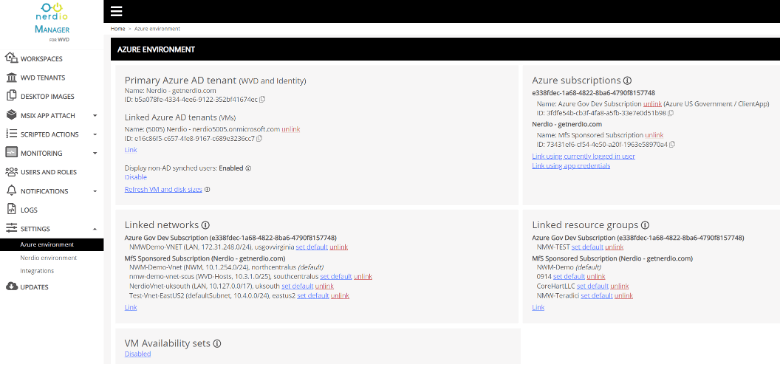
All you need to do is “Link” the network and resource group where the AVD environment is deployed into. Next, you select “Workspaces” (at the top of the left-hand menu), do a webpage refresh, and you will see the existing AVD deployment pop up almost instantly.
After that, you will go to “Associate” (you’ll see a button with this text appear), your existing Workspace or Tenant with Manager for AVD.
How long this will take depends on the number of host pools and machines in those host pools. Somewhere between 5-15 minutes on average.
That’s it, you are done.
Migrating your AVD deployment from tenant to workspace
As I am sure you all know, AVD comes in two flavors: the old, non-ARM version-based Tenants, and the new ARM version of AVD based on Workspaces.
If you are still using Tenants, we encourage you to migrate your AVD deployment from Tenants over to Workspaces with a few mouse clicks, all fully automated.
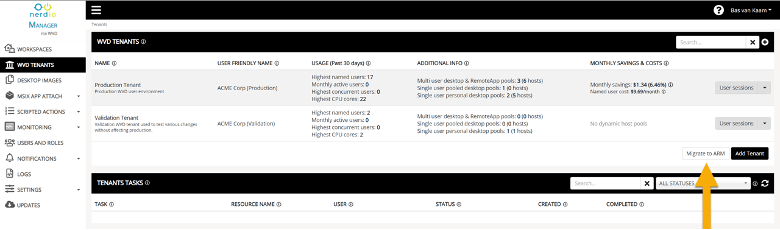
Go over to the Tenants section via the left-hand side menu and click on “Migrate to ARM” on the right-hand side, see the below image as well.
Once you’ve clicked “Migrate to ARM,” the below will appear.
Here, you will be able to select your host pool of choice (part of Tenants), including the Workspace where you want to migrate this host pool over to. Finally, choose what you want to do with the current user assignments. Think of this as host pool metadata being migrated, it will only take a few seconds.
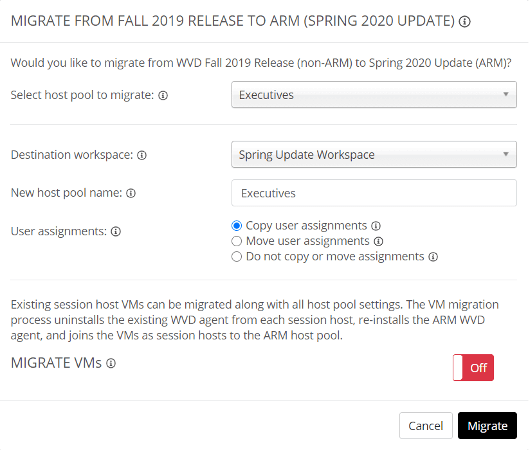
Of course, we also enable you to migrate the underlying virtual machines part of your Tenant host pool. Click “Off” (this will turn it “On”) next to “Migrate VMs, as displayed above. Next, you can configure how you want to migrate your VMs.
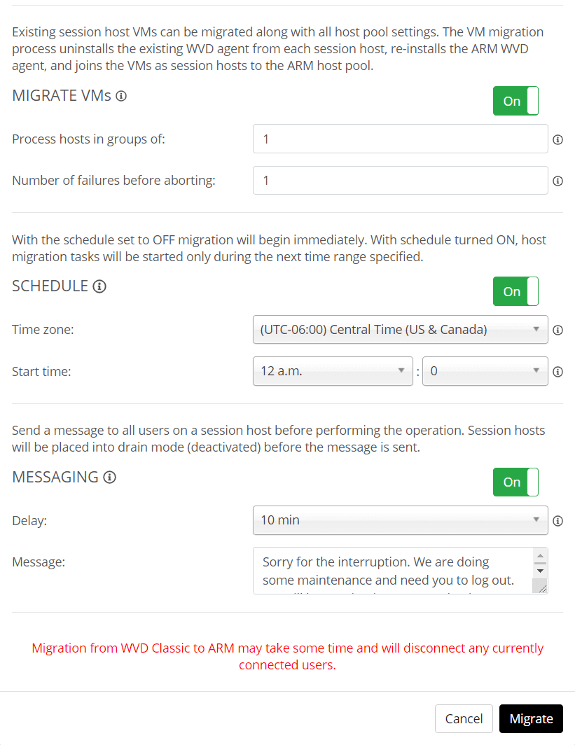
First, select how many VMs you want to migrate at the same time. If it is a host pool with a dozen or more machines in it, this is a very welcome feature.
Fill in the number of failures allowed before this process will be halted.
Schedule when you want the migration to take place; during night-time, for example. Or do not schedule and execute right away.
Under messaging, you can fill in your own text. If the system runs into active user sessions while performing the migration, users will first be notified. Then, after 10 minutes,15, 30, etc.; whatever you configure from the dropdown menu, the migration will take place.
Once the migration has finished, you will find your host pool under Workspaces instead of Tenants, which is exactly what we wanted to achieve.
And there you go! A few clicks and the rest is automated for you.
Of course, there’s much more to tell and show once you’ve installed Nerdio Manager for Enterprise, and I would be more than happy to do so, though this should give you an indication of what we are capable of. Think of it as the tip of the iceberg — there’s much more where that came from.
Download Nerdio Manager for Enterprise from the Azure Marketplace today and start your free 30-day trial. Or, reach out to schedule a demo!