How to migrate QuickBooks customers to the cloud in 5 steps

Table of Contents
For managed service providers (MSPs), few challenges are as complex as migrating QuickBooks customers to the cloud. Despite the growing trend towards cloud-based solutions, many customers remain hesitant to adopt QuickBooks Online due to feature limitations or existing investments in installed versions.
This conflict between maintaining legacy infrastructure and embracing modern cloud technologies often leaves MSPs grappling with the burden of supporting on-premises QuickBooks environments.
In this guide, we’ll explore how you can address these challenges by migrating QuickBooks customers to the cloud using Microsoft Azure and Nerdio, achieving optimal performance, accessibility, and cost-effectiveness.
Step 1: Price and architect
Before diving into the migration process, it’s crucial to accurately assess the cost and architectural requirements of migrating QuickBooks to the cloud. Nerdio has compiled a list of key qualifying questions to ask your customers up front to determine the optimal Azure setup and pricing structure:
- How many users need to access QuickBooks? About how many people access QuickBooks concurrently?
- Do you currently have Microsoft 365? If yes, what edition (Essentials, Business Premium, E3, etc.)?
- Are you using Entra ID, an onsite Active Directory, or some other form of identity services?
- How much storage is required for your QuickBooks data?
- Do you do a lot of printing or scanning?
- Do you need to export to Excel or email from QuickBooks?
- How many hours per day do users access QuickBooks?
Once this information has been gathered, it’s time to jump into the Nerdio Cost Estimator. The Cost Estimator is a game-changer for MSPs embarking on the QuickBooks migration journey. Purpose-built for MSPs, this tool simplifies the pricing and architectural process, ensuring accurate quotes, lower costs, and higher margins.
One of the primary advantages of the Nerdio Cost Estimator is its seamless integration with the native Azure calculator. While the Azure calculator provides raw data, Nerdio’s version presents information in a user-friendly format tailored to MSPs’ needs. This ensures clarity and transparency throughout the pricing process, safeguarding against misquoting that could jeopardize profitability.
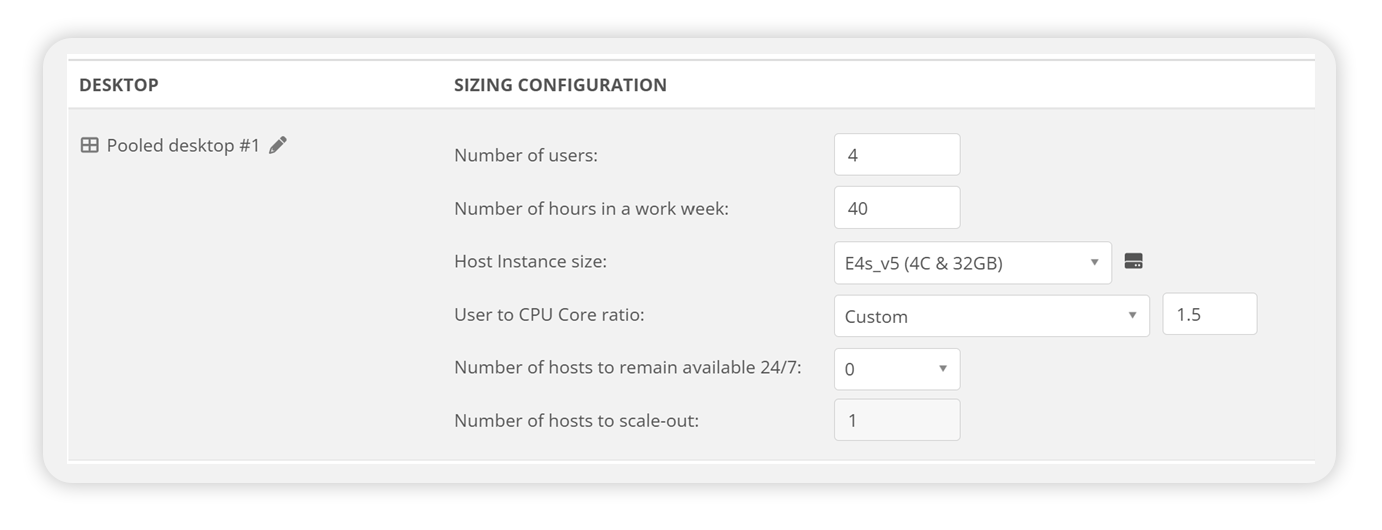
For this exercise, let’s assume a small team of four users needs access to QuickBooks for approximately 20-40 hours per week. They have two aging on-premises servers and already have Microsoft 365 Business Premium licenses. Let’s see how we can update the default inputs on the Nerdio Cost Estimator to accurately price this and maximize profitability:
- Region: Start by selecting the correct region for your customer – in this case, it’s the South Central US. Note that Azure regions are priced differently based on factors like supporting costs and labor expenses.
- Number of users: Update the number of users to four (or however many users need to access QuickBooks) based on your initial qualifying questions. That then opens up a grey box on the screen where you can configure your pooled desktops.
- Number of servers/hosts always on: We want to keep this number as low as possible and determine the runtime needed to align resource allocation with actual usage patterns. Since our customer in this scenario is only working 20-40 hours a week in QuickBooks, we can save costs by selecting to leave zero machines running 24/7 and up to one machine running. Alternatively, you could select to keep one machine on (purchased on a reserved instance from Microsoft).
- Resources: Then, you’ll want to look at what kind of resources your customer will need based on the requirements on the Intuit website.
- Size: Select your machine based on how much memory and CPU your workload will require. For this example, we selected the latest generation Intel machine — E4s_v5 (4C & 32GB).
- Number of hours users typically work: By overestimating the number of hours needed, an MSP can deliver flat rate pricing to their end customer, eliminating the typical uncertainty with consumption-based cloud pricing. In this case, with a customer working 20-40 hours a week, we selected 50 hours. As long as the users consistently access QuickBooks less than 50 hours per week all 52 weeks of the year, the service provider’s cost will be less than what is quoted allowing for additional margin.
- Ratio of users per CPU core: We need to figure out how many users can share a single CPU core on this machine. While the average ratio across Nerdio-managed desktops is 1.7, selecting a slightly more conservative ratio, such as 1.5, allows more resources when the customer needs them.
- No servers?: If you don’t have any servers in the environment, MSPs can rely on a static host with Microsoft Entra ID. This approach significantly minimizes the infrastructure footprint, with all QuickBooks components and user desktops running off a single machine.
Caveats to consider:
- Risk of data loss during reimaging: Reimaging the single static host will result in the loss of all data stored on it. Since the re-imaging process clones a golden image and wipes out everything on the disk, including the company file, extreme caution must be exercised to avoid unintentional data loss.
- The critical importance of backups: Given the risk associated with potential host failures, robust backup strategies are imperative to safeguard against data loss.
- Avoidance of ephemeral disks: Ephemeral disks, which wipe out all data upon machine reboot, should be avoided to prevent inadvertent data loss.
- Limitations on pool configuration: Only a single machine can be hosted in the pool, prohibiting the ability to load balance users across multiple machines. However, larger machines can be utilized (upsizing) to accommodate increased user loads.
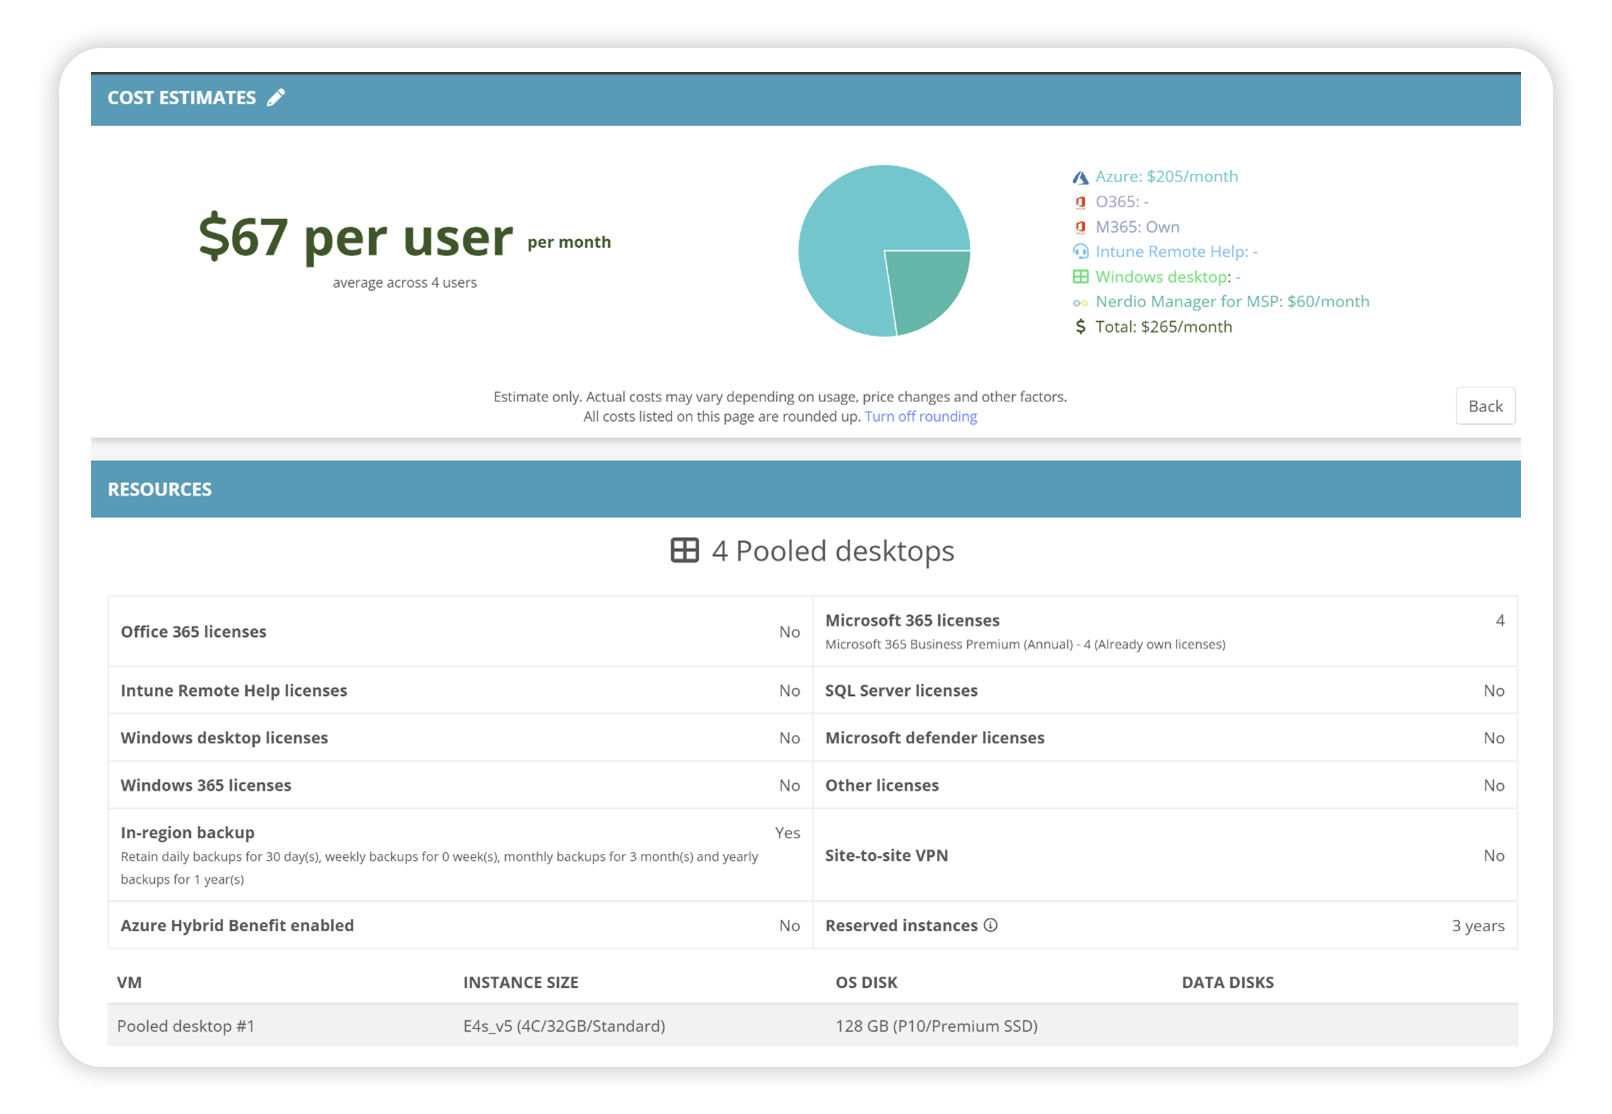
- Licensing options: Every user that needs to access QuickBooks will require a Business Premium license that allows you to run this virtual desktop as an end user. As mentioned previously, our customer in this scenario already owns Business Premium licenses, so we can select “already own” in the calculator. You will want to make sure you’ve verified the correct license specifications.
- Discounts: You get a discount from your Cloud Service Provider (CSP) for purchasing Azure from them. In this scenario, there is a 9% discount which we can input into the Cost Estimator.
Once this final piece of the puzzle is entered, we see our cost is only $67/user/month, leaving plenty of room for machine and managed services considering most popular QuickBooks hosters charge closer to $80/user/month.
Step 2: Gather resources and credentials for provisioning
Before diving into the provisioning process, there are a few prerequisites that need to be addressed with your CSP:
- Order Azure: This can typically be done through your CSP portal (Pax8, Sherweb, etc.). Search for the Azure plan, often available as a $0 SKU, to gain access to the Azure environment.
- Microsoft 365 access: Ensure you have access to the customer’s Microsoft 365 tenant. For new customers, provisioning a new Microsoft 365 tenant and purchasing the necessary licenses, such as Microsoft 365 Business Premium, may be required.
- Important credentials: Secure appropriate credentials in advance for smooth provisioning. You’ll need the global administrator role on the Microsoft 365 tenant and the owner role on the Azure subscription. Ordering Azure usually grants global administrator permissions, but acquiring the owner role for the subscription may require additional steps.
With the prerequisites in place, provisioning the environment becomes much more straightforward, particularly when using the Nerdio Provisioning Wizard.
Step 3: Build
With the pricing quote and necessary subscriptions in hand, the next step is to begin building the desktops and networks within the provisioned environment. Leveraging the pricing quote compiled earlier ensures that you’re following the specifications outlined to create a seamless user experience.
Nerdio Provisioning Wizard
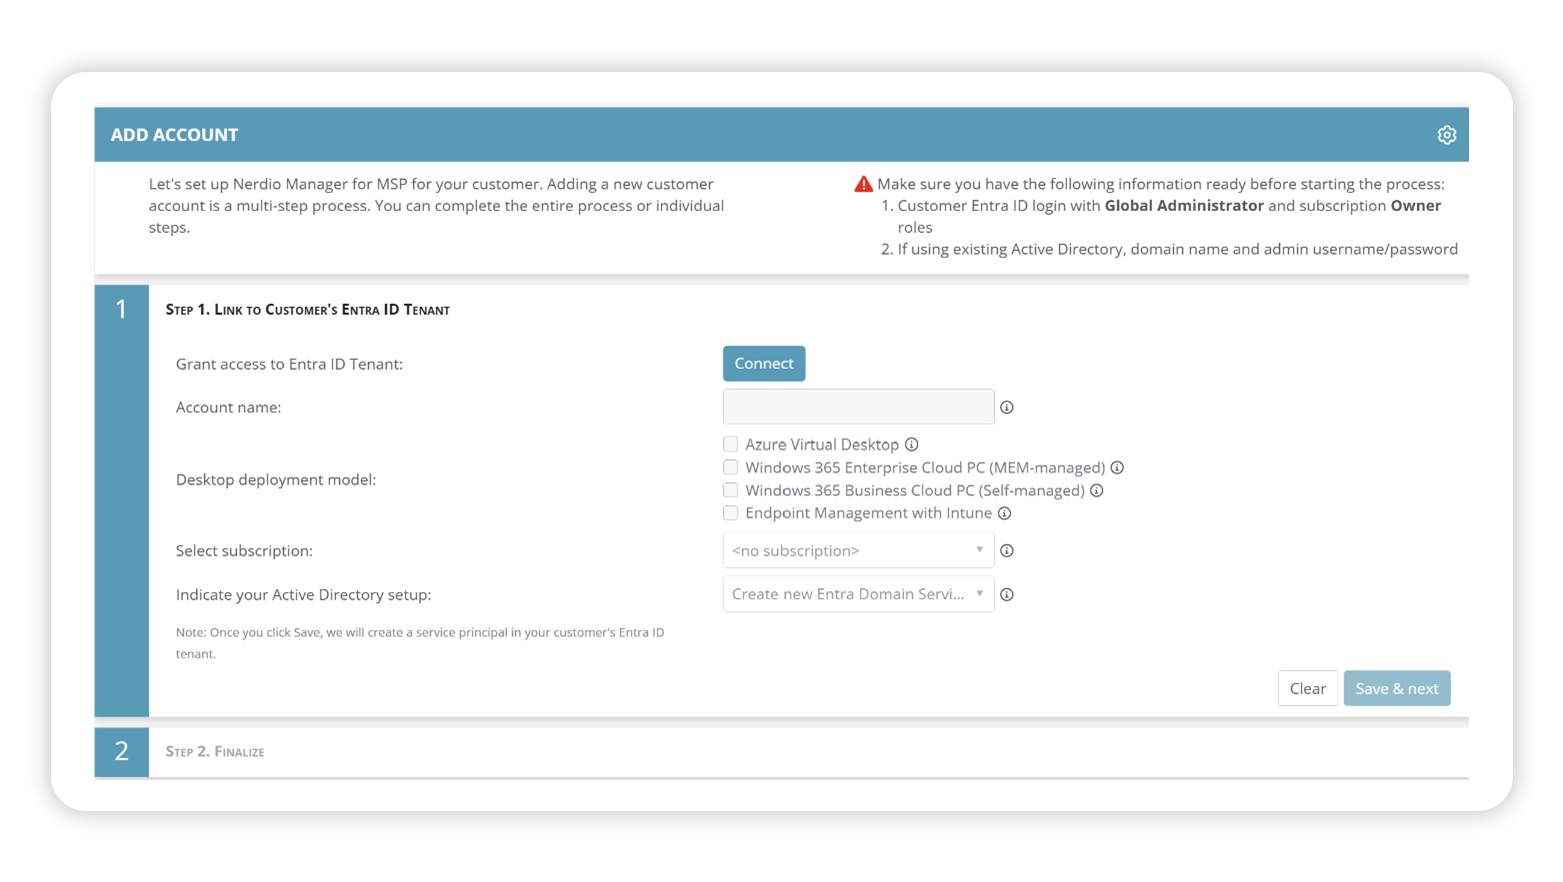
Start by navigating to the Nerdio Provisioning Wizard, then click “add an account” and give Nerdio Manager for MSP access to the customer’s Microsoft 365 tenant and Azure subscription.
Desktop specifics
Begin detailing what you are going to build. Enter the account name, select Azure Virtual Desktop (AVD), which is how you will deliver QuickBooks (not over a VPN), and select the appropriate customer subscription. You’ll also want to indicate which directory setup you want to use. We are using Entra ID for this customer, which is fully capable of supporting this type of simple environment, but you could use Entra ID Domain Services or even a traditional Domain Controller. Nerdiothen creates a service principle to facilitate communication between applications and execute changes within the customer’s environment. This step is crucial for both provisioning and ongoing support tasks for the customer.
Network specifics
In the networking section, you’ll start by selecting the region — South Central US. Because this is a new customer, you’ll want to make a new resource group and name it. Then create a new network and name it, give it an address space, and input the subnet name and address prefix. Once you hit save, Nerdio takes charge by delving into the input subscription and constructing the required network infrastructure. This behind-the-scenes process streamlines the network setup, allowing you to focus on creating machines that users can easily log into once the environment is fully established.
Step 4: Create the virtual desktops
Creating virtual desktops for specific client environments creates a setup tailored to the customer’s needs. Let’s break down how to navigate this process effectively:
Create host pool
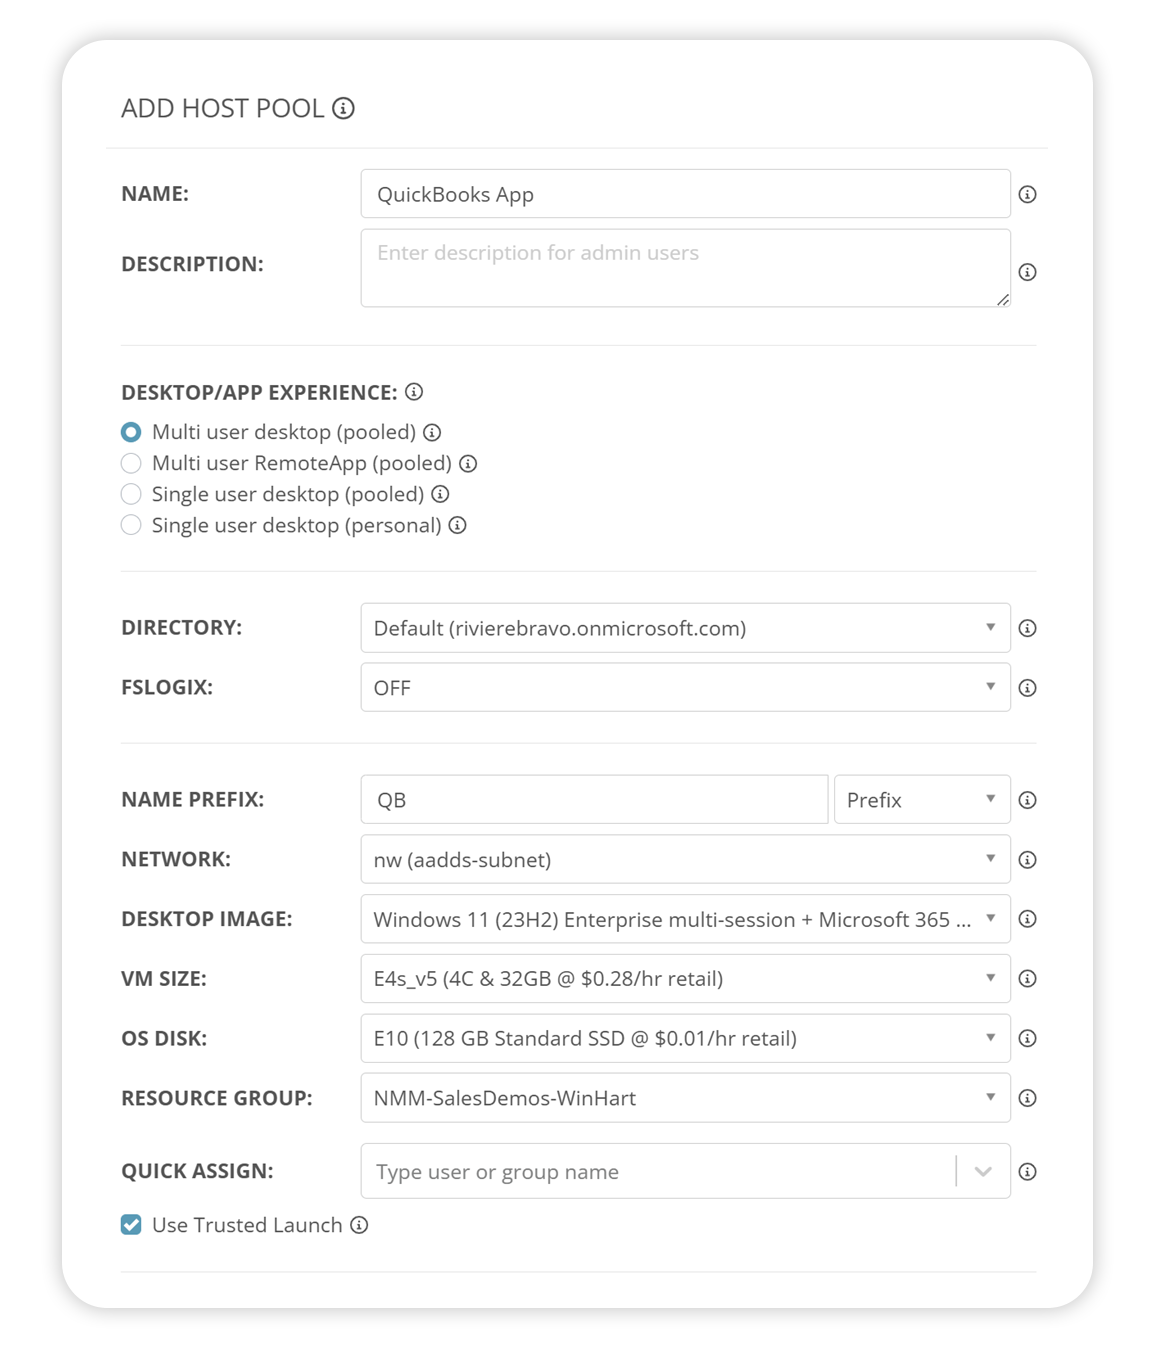
Navigate to the host pools tab and click create new host pool. The host pool and machine size should be configured according to the specifications outlined in the pricing quote. Then, select an appropriate desktop image from the options provided by Microsoft. Once configured, click create, and Nerdio will proceed to build the pool within Microsoft Azure. Provide a clear and recognizable name for the host pool, as it will be visible to clients during login.
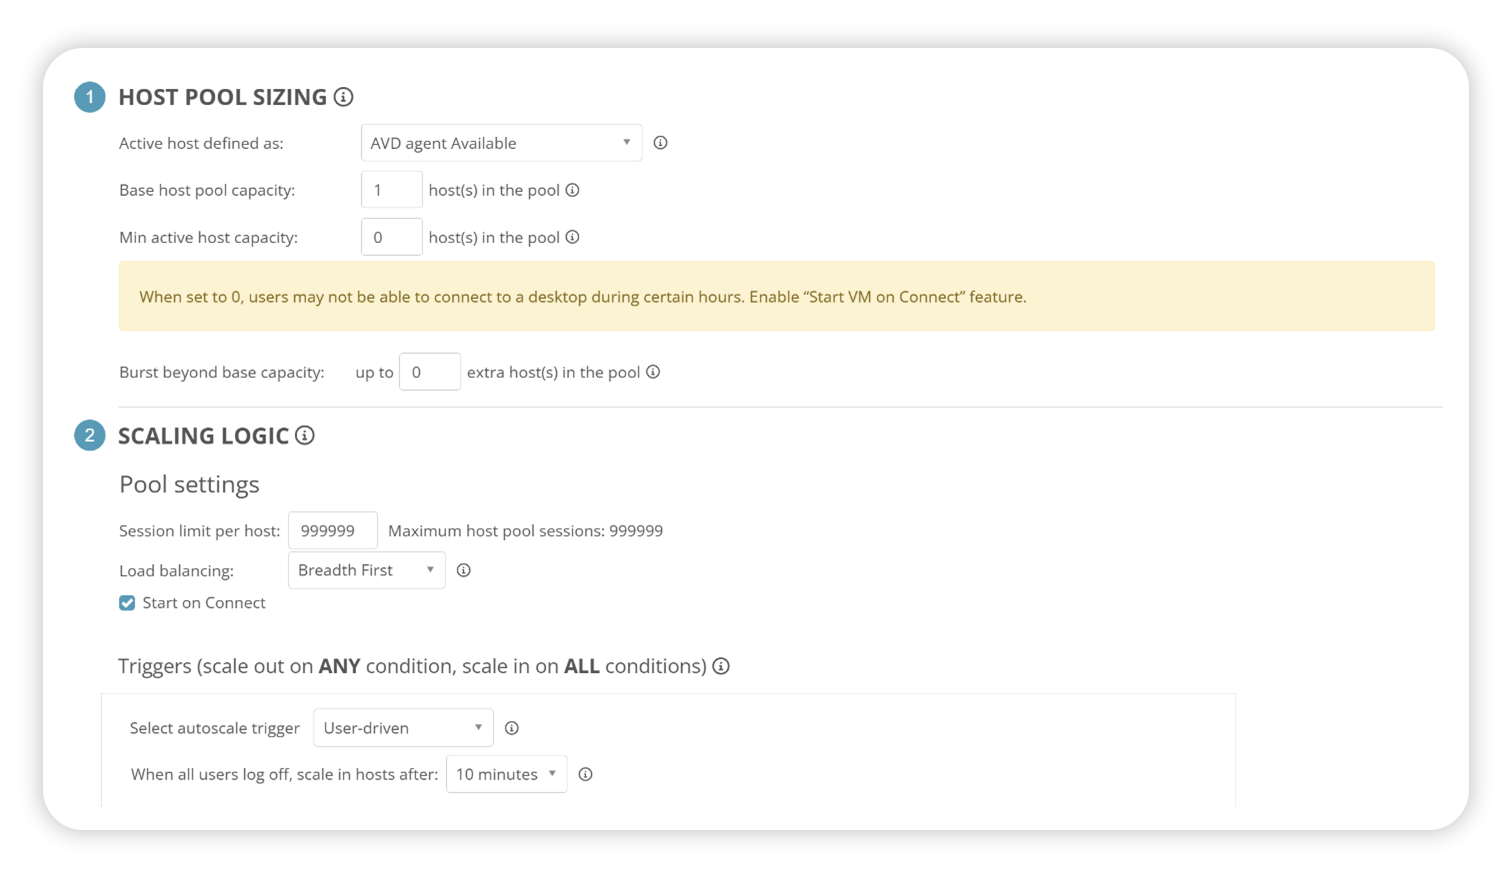
Configure Auto-Scale And host pool sizing
Enable Auto-Scale to enforce policies ensuring the required number of machines are available inside the pool. This feature can be adjusted to automate the process of building machines as needed, inheriting previously set configurations. Consider enabling the “Start VM on Connect” feature to automatically power on machines when users attempt to log in. This is a great option to save money for the customer, but also ensure resources are available when needed.
For this customer, we will have one machine in the pool pre-built and ready to power on any time a user needs to work by using “Base Host Pool Capacity”. With user-driven Auto-Scale, the machine will automatically turn off once the last user logs off at the end of the day, saving money and compute resources when not needed.
Enable and configure session time limits
Implement session time limits to manage idle sessions effectively, disconnecting users after a specified period of inactivity for efficient resource utilization.
Enable Trust Launch (if desired)
Enhance security on the machines by enabling Trust Launch. You can also configure Secure Boot VTPM to ensure security measures are applied to all newly created or re-imaged hosts in the pool. Turning this feature on early prevents having to recreate a machine once it contains the company file and QuickBooks data.
Create a security group and assign it to a host pool
Use Nerdio to create new users in Entra ID if they don’t already exist and assign licenses and other relevant permissions. Then, create a security group and include any users that need to access QuickBooks and assign the security group to the virtual desktop host pool to enable Nerdio licenses and allow users to log into their new environment.
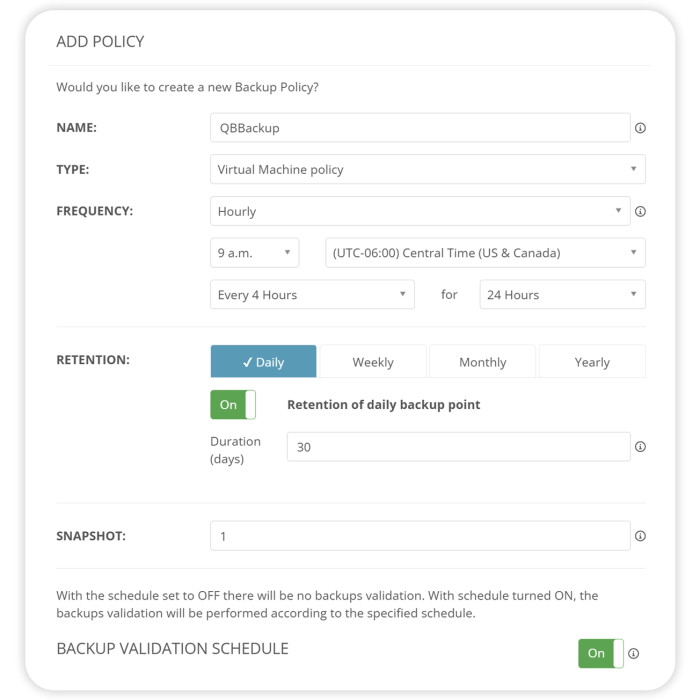
Create and apply backups
Add the group to the backup recovery vault and determine the backup location (whether locally redundant, geo-redundant, etc.). Enhance and default backup policies as needed to align with customer requirements and apply the backup policy to the machine once it is created for comprehensive data protection.
Step 5: Install and migrate
Start the QuickBooks installation and migration process by first logging in as an administrator, who can download and install the necessary QuickBooks application on the virtual desktops within the host pool.
Next, the migrate company files. This process involves transferring existing company files and data to the newly installed QuickBooks application on the virtual desktops. Once the migration is complete, user access is granted to authorized personnel.
Upon completion of the setup, users can download AVD and access the virtual desktop environment, where they can securely log in and continue using the QuickBooks application to manage their financial tasks.
Additional resources
Migrating QuickBooks customers to the cloud can be a daunting task for MSPs, but with the right approach and tools, it can be accomplished efficiently and effectively.
By leveraging Microsoft Azure and Nerdio’s comprehensive management platform, you can address common challenges associated with supporting QuickBooks while meeting customers’ demands for 24/7 secure access to financial data from anywhere, at any time.
For a deeper dive on how to transfer QuickBooks customers to the cloud, check out our full webinar.