


Throughout this article I will be focusing on virtual machines and data as part of your Azure Virtual Desktop (AVD) environment, combined with the Nerdio Manager for Enterprise deployment – from an architectural point of view. This data may be stored on your VMs, in the form of user profiles, departmental and personal user data.
As you may know by now, Azure Virtual Desktop is an Azure Cloud-native service hosted and managed by Microsoft. This means that you don’t have to worry about the underlying infrastructure, such as the database, web portal, the brokering and load balancing of user connections, and so on.
You also do not have to update these components or make them highly available; Microsoft takes care of that for you.
So, what do you need to focus on?
Sets and Zones
When you create a AVD host pool through the Azure portal, you can select the VMs to be deployed in an availability set. When enabled, your VMs will be spread over multiple physical servers, compute racks, storage units, and network switches within a single Azure datacenter.
To protect your VMs from failures and updates, they are placed in and spread out over fault and update domains.
A fault domain is a logical group of physical hardware that shares a common power source and network switch, similar to a rack within an on-premises data center. By default, the virtual machines configured within your availability set are spread across up to three fault domains for (AVD) ARM deployments. This limits the impact of potential physical hardware failures, network outages, or power interruptions within an Azure datacenter.
An update domain is a logical group of physical hardware that can undergo maintenance or be rebooted at the same time. By default, five non-user-configurable update domains are assigned. A sixth VM will be placed in the first update domain, etc.
Considering the above, if a hardware or software failure happens, only a subset of your AVD VMs are impacted.
Think of availability sets as a local datacenter configuration option, meant for redundancy options.
There are a few more details to consider, like the type of storage used for your VMs, for example, but this is the gist of it.
While this helps, all data still resides in the same data center. Preferably, we would like to take it a step further and have our data and VMs separated over a greater distance. This brings us to Availability Zones.
Zones
Availability Zones are unique physical locations within an Azure region. Each zone is made up of one or more data centers equipped with independent power, cooling, and networking. To ensure resiliency, there is a minimum of three separate zones in all enabled regions – make sure to check if your region of choice offers support for Availability Zones, not all zones do.
In turn, Availability Zones in an Azure region are also a combination of fault and update domains as highlighted above. If you create three or more VMs across three zones (the minimum number of zones/data centers per region) in an Azure region, your VMs are effectively distributed across three fault domains and three update domains, one in each zone/datacenter.
Availability Zones within a region are usually 20 to 50 miles apart and are connected by extremely fast network connections.
Keep in mind that lot of AVD deployments are based on non-persistent virtual machines, meaning no data is stored locally. The above might (will depend on your RPO requirements as well) be an overkill – machines can be recreated based on your main / master image (make sure to backup your images regularly before making changes using Manager for AVD’s built-in backup functionality including versioning and rollback options), especially when making use of Nerdio’s autoscaling engine. Of course, when dealing with personal assigned, persistent virtual machines this is another story.
NOTE: because Nerdio Manager is built on top of resilient Azure PaaS services that are automatically redundant in an Azure region across availability zones, there is no action necessary on your part. PaaS services will automatically fail over to an available zone in case of a datacenter outage and NMW will continue to work as expected.
Think of Availability Zones as a way to protect against data center level failures.
Microsoft Documentation and Availability Zones
If you search for documentation on how to set up Availability Zones for AVD, you are unlikely to find any. There are multiple community-driven posts explaining in detail what needs to be done to get this working (PowerShell incoming), but there is no content from Microsoft directly – related to AVD, that is.
This is where Nerdio shines.
TRY NERDIO MANAGER FOR ENTERPRISE FREE FOR 30 DAYS!
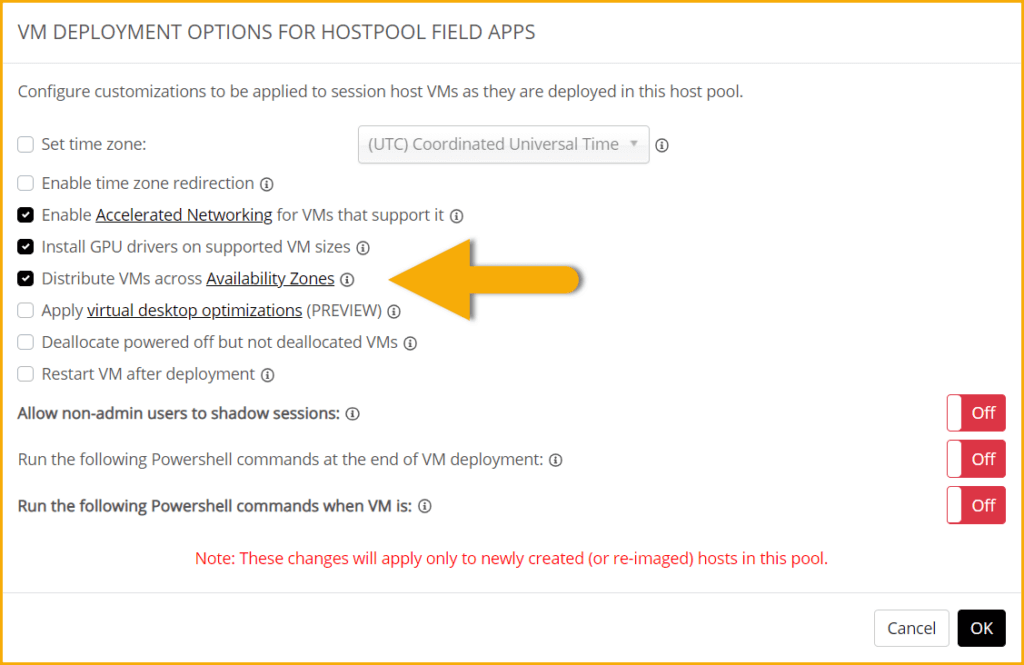
Enabling the use of Availability Sets, which applies to your entire WVD deployment by default, is done by checking a box from our settings page.
However, configuring Availability Zones for your VM’s can be done per host pool, giving you even more granularity. Again, a click of a mouse is all you need, as you can see on the screenshot below.
What About Protecting My Data?
Good question! Of course, backups, snapshots, and such can help with this, but that’s out of scope for this article.
When we look at the data involved, it primarily comes down to profile user data, personal and departmental data.
If you make use of Azure Files, preferably Premium (33% price drop announced recently), a very popular solution often used in combination with FSLogix Profile Containers and MSIX App Attach, not only will this help you achieve high performance, it will also make it a lot easier to create a highly available setup.
Next to your Profile Containers and MSIX App Attach packages, Azure Files are also used to store personal and departmental data. Think of it as a direct replacement for your traditional file server without needing to manage an actual file server in Azure (IaaS). However, you will still be able to work with file shares like you are/were used to in the traditional sense.
High Availability
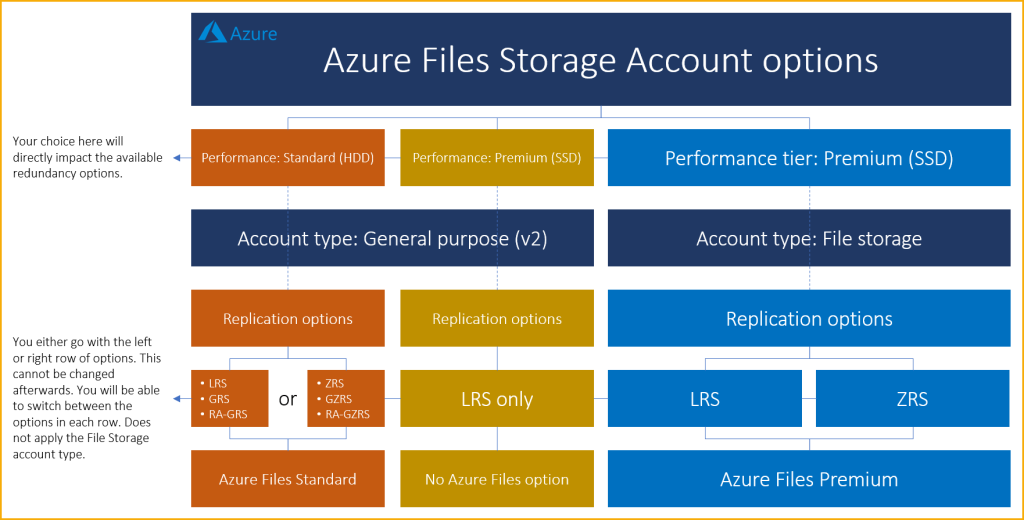
Azure Files are deployed into Azure storage accounts. This provides the option to configure and use several additional features, like data encryption, at rest as well as in transit, flexible identity/authorization options, backups, snapshots, and more.
One of the main features I want to highlight here is the ability to make use of a (zone) redundant storage account. This can be either “Locally” or “Zone” redundant storage.
Locally redundant storage, referred to as LRS, means that every file is stored three times within an Azure storage cluster. This protects against loss of data due to hardware failures, such as a bad disk drive. This is a single-Azure datacenter configuration.
Zone redundant storage, or ZRS, means that every file is stored three times across three distinct Azure storage clusters. Zone redundancy gives you three copies of each file; however, these copies are physically isolated in three distinct storage clusters in different Azure Availability Zones. This is a multi-Azure datacenter configuration.
Regarding the latter, a write to storage is not accepted until it is written to the storage clusters in all three availability zones.
As a side note: if you want to migrate your existing on-premises file server/shares up to Azure File, give this article a read.
Another option is to choose geo-redundant storage – only available for Azure Files Standard.
Geo-redundant storage is like locally redundant storage, in that a file is stored three times within an Azure storage cluster in the primary region. All writes are then asynchronously replicated to a Microsoft-defined secondary region. Meaning, Geo-redundant storage provides six copies of your data spread between two Azure regions. In the event of a disaster, Microsoft will perform a failover so that the secondary in effect becomes the primary, serving all operations. This can also be performed manually.
Since replication happens asynchronously, this will have an impact on your RPO (Recovery Point Objective). We’re talking minutes instead of hours, but it might still be worth giving it some thought.
Of course, user profiles and data get corrupted from time to time as well, making use of Microsoft’s Azure Backup for Azure File Share will make it easy to restore corrupted profile containers when needed, see this article for some more information.
Costs
Storing your files multiple times in different locations, even if it is within the same Azure datacenter, (ex. with redundant storage) means your costs will go up as well – everything comes at a price, right?
The more data you store, the higher the costs will be, which makes sense.
The use of Availability Sets and Zones is free of charge. Also, you won’t duplicate any machines, and the VMs you create will be spread amongst the available fault and update domains, as well as different Azure datacenters, depending on the chosen configuration. 99.99% VM uptime SLA is offered when two or more VMs are deployed across two or more Availability Zones within an Azure region.
What you will eventually pay for is egress data between VMs in different Availability Zones. See this article for more information. Data transfer billing between Virtual machines across availability zones will begin as of February 2021.
Data exchanged between different regions, in the case of GEO redundancy, for example, is also charged. See the article mentioned above for more detailed information on this as well.
Putting It All Together
First, the main AVD service is managed by Microsoft, nothing we need to (or can) do there.
The main thing(s) you need to worry about are your VMs and data, which can be challenging enough.
As mentioned, (and shown), setting up Availability Zone support can be configured per host pool by selecting a checkbox. Lastly, we will discuss how to enable Availability Sets instead of Zones within Manager for AVD – this setting applies to your entire AVD deployment.

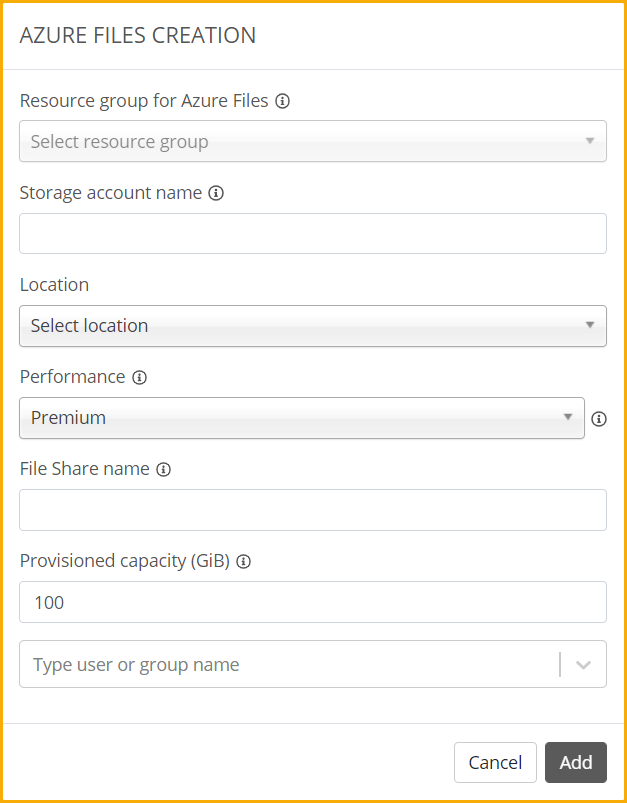
The setup and configuration of Azure Files is also something we have fully automated, as you can see in the image below. Everything that needs to be done on the underlying Azure platform will be taken care of for you. The storage account created as part of this process can be changed afterward, from LRS to GRS or RA-GRS, for example.
Manually creating and working with storage accounts, Azure, Files, FSLogix, etc is also possible. This can be done in case you already have everything running and don’t want to use Nerdio Manager for Enterprise to set up and manage this.
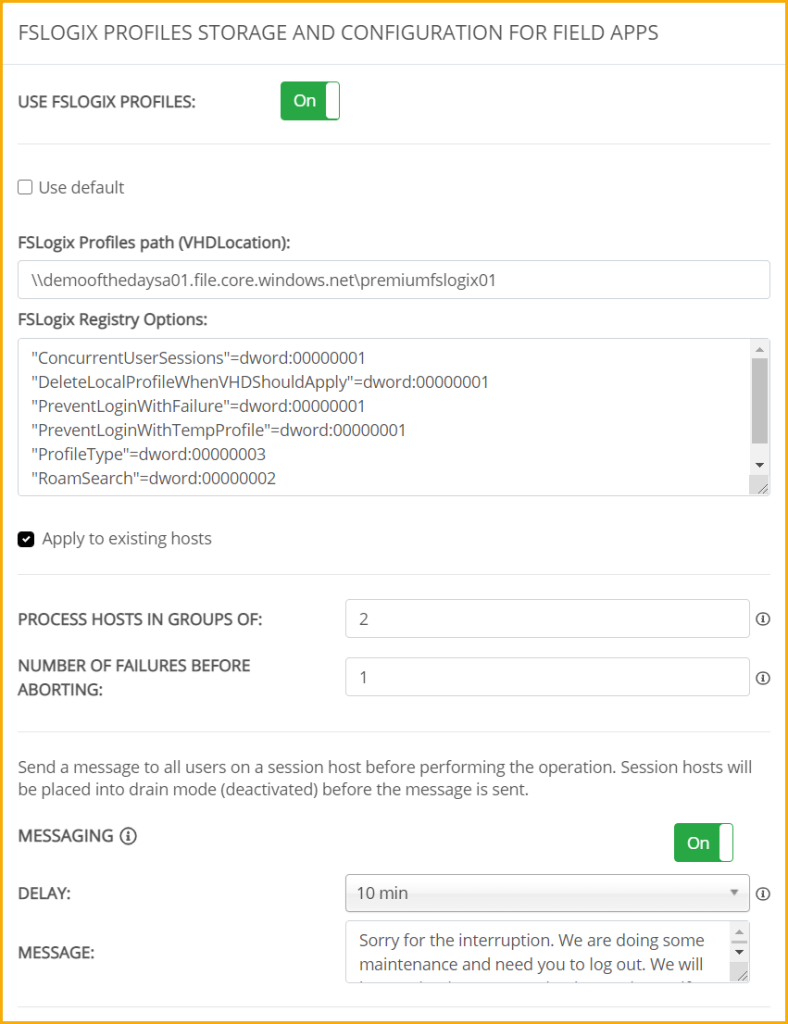
The same applies to setting up and using FSLogix Profile Containers. This can be configured per host pool as well. Enable or disable, use different storage locations, change the registry options you’d like to apply, etc. These types of changes can now be applied without needing to re-image your machines or add in new ones.
The best thing is, once you have everything set up using Nerdio Manager for Enterprise, it will just continue working, even if the Nerdio Manager for Enterprise installation becomes unavailable for any reason. A thing worth considering here is that Nerdio Manager for Enterprise is also responsible for scaling the AVD environment (adding, removing, starting, stopping, healing etc. hosts). When NMW is unavailable this will need to done manually through the Azure portal.
Backing up Nerdio Manager for Enterprise is done as per this article. This enables you to restore NME is case of data corruption, for example.
However, sessions will still be brokered, all data will be accessible, etc. We directly integrate with WVD and other native Azure solutions, which makes Nerdio Manager for Enterprise extremely powerful and flexible, but also non-disruptive.
This way, your VMs will be shielded by Availability Sets or Zones and your data will be replicated to other Zones or Regions.
As highlighted, your Manager for Enterprise application / deployment is bases on native Azure PaaS services which are highly available by default (Availability Zones) in the case of a datacenter / zone failure or outage.
Microsoft takes care of the AVD service in Azure.
If for whatever reason Nerdio Manager for Enterprise breaks, or needs to be reinstalled (instead of doing a restore), you’ll be up and running, including associating your existing AVD environment within 1-5 hours. Setting up Nerdio Manager for Enterprise is done within 45 minutes. Onboarding an existing AVD environment takes about 15 to 20 minutes, depending on how many machines you have running.
Not a bad RTO (Recovery Time Objective), is it?
As a Final Note
Putting together a Disaster Recovery Plan, which includes concepts like high availability, as discussed throughout this article, is about more than leveraging Availability Sets/Zones and/or redundant data storage (take networking, for example, authentication, and more ). This article is meant to help you on your way and to point out some of the low-hanging fruit when using or thinking about using Nerdio Manager for Enterprise. For more information on making your WVD and Nerdio environment highly available, considering DR in the broader sense including an entire Azure Region outage have a look at this article.
Thank you very much for reading.
Bas van Kaam
Nerdio Field CTO, EMEA/UK