


GPU-supported machines on Microsoft Azure have been a hot topic lately, especially with the introduction of the new NVv4 AMD-powered virtual machines that has been generally available (GA) since March 2020. Let’s dig in a bit more.
The use-cases for GPU-enabled VMs on Azure vary. Of course, graphical resource intensive workloads come to mind, though GPUs greatly enhance a lot of “normal” everyday workloads as well. Applications like Word, PowerPoint, Excel, and so on – basically the whole Office/Microsoft 365 suite – can all greatly benefit from having a GPU available.
This also applies to Windows 10, various browsers, and more.
Don’t get me wrong, I’m not suggesting you always need a GPU, but it’s worth giving it some thought and to do some research before deciding.
GPU-enabled Machines Drawbacks
The biggest drawback, and what holds back most companies from using GPU-enabled machines today, are still the associated costs. The way GPUs are licensed, especially the NVIDIA series, also plays a role in this.
While NVIDIA cards are considered more flexible and advanced from a performance perspective, compared to AMD, they are also more expensive. To run these products (on-premises) you will need to purchase a physical NVIDIA GPU and a virtual GPU software license that addresses your use case. As always, there are pros and cons.
With software sold separately from the physical GPU you have maximum flexibility to deploy the GPU that is best suited for your data center and to stay current with the latest features and enhancements released throughout the year. Use-cases include: Virtual Applications, Virtual PC, Virtual Data center Workstation, and Virtual Compute Server, read more here to get a bit more detail on each. Besides the focus on graphical intensive workloads and various virtual desktop scenarios, NVIDIA also offers solutions focused on AI, Deep Learning, and Data Science. As you can see, they have a very diverse portfolio.
However, the software that runs on top of your GPU needs to be licensed separately. You have two options: an annual subscription or perpetual. Both require a per user price, either per month (annual) or a onetime fee (perpetual). Also, the perpetual licenses come with a separate (it’s included as part of the annual license) Support, Updates, Maintenance and Subscription (SUMS) license at an additional yearly cost. This gives you access to new software releases throughout the year, including any technical support you might need.
Of course, when you deploy GPU enabled machines on Azure, these costs will be part of the overall package, so to speak. The above is meant to give you some background information on how these prices are built up.
Advanced Micro Devices
The earlier highlighted NVv4 virtual machines are powered by AMD Radeon Instinct MI25 GPUs combined with AMD EPYC ‘Rome’ CPUs. The unique selling point of the Instinct MI25 GPU is that it can be split into smaller GPU segments (partitioning) that can be assigned to individual VMs. You can start as small as 1/8th of a GPU with a 2 GiB frame buffer up to a full GPU with a 16 GiB frame buffer. Also, you buy the physical GPU, and that’s it.
More information on the various partitioning options can be found on this page. Next to the above, NVv4 Virtual Machines support up to maximum of 32 vCPUs, 112GB of RAM, and 16 GB of GPU memory, so you have various configurations to play with.
This brings the use of GPUs another step closer, even for the average task worker.
Of course, there is a whole series with NVIDIA backed GPU virtual machines as well. Do note that as it stands today, these cannot be partitioned and spread over multiple Azure virtual machines. However, keep reading because there are other methods that we can leverage to bring down the overall costs of both types of GPU-enabled machines – or any other type of VM, for that matter.
By the way, visit this page to find out about all the supported Azure VM types on Windows Virtual Desktop. Go here for an overview on some of the most common VM types available on Azure globally, including the N series (GPU-enabled).
If you are interested in using GPU-enabled machines, go with the solution that fits your use-case and budget best. Don’t look at pricing alone; test. It’s Cloud so it’s easy.
TRY NERDIO MANAGER FOR ENTERPRISE FREE FOR 30 DAYS
Saving on Costs
While being able to split up a GPU into smaller segments will definitely save on costs, assuming you don’t need a full GPU, this is just one piece of the puzzle. These machines will still cost you more than your average Azure VM.
Another way to save big on costs, and an overall more economical approach, would be to have an auto-scale mechanism in place that will automatically add, remove, start, stop, deprovision/deallocate, etc. GPU-enabled machines for you. Based on scaling logic and backed by an intelligent algorithm.
An Example + Auto-scaling in More Detail
Using Nerdio Manager for Enterprise, you can configure two types of host pools: Static and Dynamic. Static means you will add and remove host machines manually, using the Nerdio Manager for Enterprise graphical interface – no PowerShell!
Dynamic means you can make use of our unique auto-scaling engine, which will add and remove machines for you, fully automated and based on pre-configurable scaling logic, including the intelligent algorithm mentioned earlier.
The pre-staging of virtual machines – to enhance the overall user experience and to overcome boot/login storms is optional as well.
First Things First: Create a Workspace
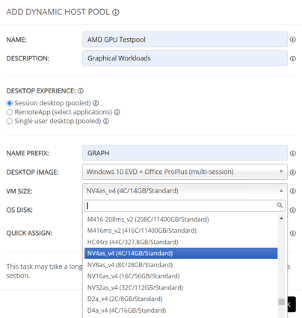
To start, we need to create a Workspace (takes 3 seconds), followed by a host pool, a Dynamic one in this case (takes 10 seconds). Let me know if you would like to find out how that’s done. In the image below, you’ll see the various NV AMD GPU-powered machines to choose from (machine types will vary depending on the region you have selected). Don’t worry, all this is easily changeable afterward. Keep an eye on the “Desktop Experience” as well. We’ll leave it at the default of “Session Desktop (Pooled)” for the purpose of this article, though, as this is a very common and popular approach.
In an upcoming blog post, I’ll address personal assigned (persistent) desktops. We have some interesting and advanced auto-scaling methods available for those as well.
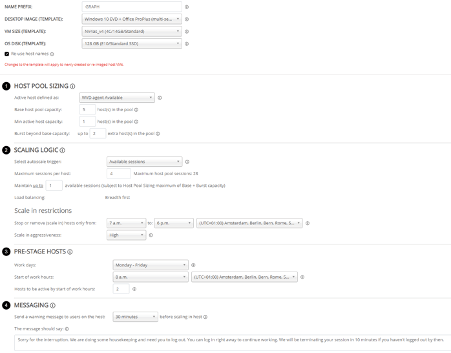
Once you click “OK” the Dynamic host pool will be created and the auto-scale configuration page will pop up. See below.
Now I’ll go over the various items one by one.
Virtual Machine Details
At the top you can see the VM details, including the VM template we selected during the previous step. This can be changed at any time. The same applies to the Desktop Image and OS Disk Templates.
Host Pool Sizing
Here we state that we want to have at least five hosts as part of the host pool at all times. These machines can be active, meaning booted or in a shutdown state. Below that, it mentions the “minimum active host capacity”. Here we configure how many hosts of the Base host pool capacity; five in this case must be active/booted at a minimum.
In the example above it is set to one. Note, however, that his can be set to zero as well (savings will be a 100% in that case).
As you can see at the top “Active host defined as” is set to “WVD Agent Available”. This is one of two states it can be in.
“WVD Agent Available” (default) means that the system will identify a session host VM as “active” only when the WVD back-end is receiving heartbeats and sees the session host as “Available”. When it is set to “VM Started”, the system will identify a session host VM as “active” as long as the VM is running in Azure.
Finally, we have the “Burst beyond base capacity” setting. When machines are added through the auto-scaling engine (scaling out), a maximum of two machines (in this case) may be added to this host pool. In the above example. that means that this host pool can grow up to seven machines in total; five as part of the base host pool capacity + a maximum of two machines that can be added by means of scaling out.
Next up is the scaling logic that the auto scaling engine uses to decide when to add and shutdown/remove machines.
Scaling Out
By default, the scaling logic is set to CPU usage. However, in the example above, I used “Available sessions”. Since these are GPU-focused workloads, they are probably less CPU sensitive. Therefore, the CPU auto-scale trigger won’t make much sense.
As configured, the auto-scaling engine will maintain up to one available session across the host pool. In larger environments, you might want to consider setting this number a bit higher. It also depends on the type of machines used and the max amount of allowed sessions per host. I’ve also set a maximum of four sessions per host, and, as highlighted above, at least one host that needs to be in a powered-on state at all times.
With this configuration applied, as soon as the first machine fills up (four sessions max, remember) a second host will automatically be started (at least one session needs to be available for use).
Once the second machine is started, and perhaps a third one later on as well, the engine will keep monitoring the active and available sessions based on the “Maximum sessions per host” setting combined with the configured timeframe and scale-in aggressiveness configuration – more on this in a minute.
If, at some point in time users start to log off, there will be no need to power on a fourth host since there will enough available sessions combined over the entire host pool.
Based on the “Base host pool capacity” there can be 5 x 4 sessions, meaning 20 in total. When there are 20 active sessions at least one machine will be added (added on top of the base host pool capacity of five). In other words, scale-out will take place.
The same applies to removing hosts. When 19 or less sessions are active across the hosts within the host pool, again, depending on the time frame and scale-in aggressiveness configured, it will start to scale-in/remove machines.
As long as no machines are added on top of the Base host pool capacity (no scaling out occurs), the auto-scaling engine will simply start and stop the machine as part of the base host pool capacity – depending on user/session demand – as mentioned above.
Scaling In… Your Attention, Please
Especially when using a hosted shared desktop model, the scaling in and shutting down of machines can be tricky. You might have multiple users on a single machine, which you want to shut down or scale-in/remove at a certain point because of the costs associated with it.
At the end of a workday, or later at night, you’d rather have a single machine with all active users on it instead of two, three, or even more machines with your users spread across. While that will enhance the user experience, it will also be quite costly, even more so when dealing with GPU-powered machines.
Because it will always be a fine line between the user experience and cost optimization, we’ve built in various features to help with that, and we can get very granular.
Stopping and Removing (Scaling in) Machines
To start, we can restrict when machines are allowed to be stopped or removed (scaled in) by setting time restrictions. We can tell the auto-scaling engine not to stop/deallocate or scale in machines based on a configurable time window, for example.
In the above configuration (image), we tell the engine to only stop or scale in machines between 6 PM and 7 AM. This is to make sure that most of your users will have left the office and/or stopped working, with some exceptions here and there. Of course, this can be changed to any time; just keep an eye on your time zone.
When users log in at night, remember the “minimum active host capacity” setting, where we can configure how many hosts would need to stay turned on at all times as part of the base host pool capacity, so no worries there, at least not from a UX perspective. Of course, setting it to zero will get you the highest costs savings.
Scale in Aggressiveness
Another advanced auto-scale feature which will help you achieve the earlier mentioned balance between the user experience and cost optimization.
Next to the highlighted time window, we can configure how aggressively the engine is allowed to scale in and/or stop machines. Let me explain the three options.
- High: Machine will always be stopped/scaled in at some point, except for the machines configured to keep running as part of the “minimum active host capacity”. After the hosts have been set to drain mode, the auto-scale engine will first look for hosts without any sessions and scale those in. Once only hosts with sessions remain, those with the lowest number of active and/or disconnected sessions will be scaled in first after notifying users and waiting for a preconfigured period of time – we’ll get to that part shortly. High will get you the biggest overall cost savings.
- Medium: Less aggressive, though still aimed at reducing costs, but not at all costs – if you catch my drift. After the hosts have been set to drain mode, the auto-scale engine will first look for hosts without any sessions and scale those in. If hosts do not have active sessions (only disconnected), those will be scaled in, too. Once only hosts with active sessions remain, the scale in process will not scale them in or stop them. As you can see, the UX plays an important role here as well.
- Low: Here, the UX gets the highest priority. After the hosts have been set to drain mode, the auto-scale engine will only look for hosts without any sessions and scale those in. Once only hosts with sessions (both active and/or disconnected) remain, the scale in process will not scale them in or stop them.
Pretty cool, right?
On average, we see savings of up to 75% in only a few days/weeks’ time.
Pre-staging
I think most of you are familiar with the concept of a boot or login storm. Here, dozens or hundreds of users will login to their desktop(s) or application(s) during a short time period, usually in the morning somewhere between, let’s say 8 and 10 AM.
If all of your machines are turned off, meaning they are in a deallocated state on the underlying Azure platform, they first need to boot. This will take a lot more time than a user logging in onto an already active machine. I purposely say “a lot of time” because from a user perspective, a full minute seems like an eternity. Most can relate, I’m sure.
Using the built-in pre-stage mechanism, we can tell the system to figure out how long it will take to have a certain number of machines pre-booted at a certain time. 8 AM in the case of our example. The auto-scale engine will make sure that the given number of machines will be ready to go at that specific time.
In this scenario I have set it to 2 machines. However, this is just as an example because given the above scenario it doesn’t make much sense. It’s meant to show what is possible and how it works, that’s all.
Of course, this has nothing to do with saving on costs, though it might still be something to consider. Start with 15 to 20 percent of your total machine count, for example, and let the auto-scaling engine take care of the rest.
Cost Indication
On the right-hand side of the auto-scale configuration screen you can find our “Estimated Monthly Costs” overview – see the image below. Note that these costs do not reflect the demo configuration displayed in this article and that the costs only apply to Azure compute and storage.

If you change the VM type, for example, the OS disk, the base host pool capacity, the number of machines that may be added to the host pool (burst beyond base capacity) … and so on… the associated costs will automatically change.
Even though your actual costs will be somewhere in between, this does give you a good indication of where you will end up. All associated costs and SAVINGS are displayed on a per tenant/workspace and host pool basis as well, directly viewable from the main management console.
Cost Saving History
Another handy feature built into NMW is the auto-scale history page. Here, you can see exactly what happened on which day/date, at what time, and why. The auto-scale engine knows exactly when machines are powered off, powered on, together with the virtual machine configuration, the type of VM deployed, the OS disk, the region you deployed those machines in, and more. Because of that, it cannot only calculate what the maximum and minimum costs will be, as mentioned earlier. It will also show you the amount you have saved compared to running those machines 24×7.
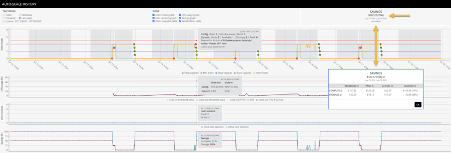
If you’d like to see a more detailed breakdown of those costs just click “Details”. In the above image, I’ve also made a screenshot of the “Details” section and pasted it into the above image.
Conclusion
And there you have it! GPU-powered machines sliced up in segments combined with the Nerdio auto-scaling engine makes for an exceptional economic solution. To bring down costs even more, you might also what to consider the use of Ephemeral OS disks, for example. Or have a look at some of the various licensing options available, like reserved instances and Azure Hybrid Benefit, to name two.
In the end, it all adds up!
I hope this helped.
Want to check out Nerdio Manager for Enterprise? It’s free for 30 days!
Bas van Kaam
Nerdio Field CTO, EMEA/UK